
Introduction
A spade for gardening is an essential hand tool used for digging soil, preparing planting beds, removing unwanted roots, and creating clean garden edges. Its flat metal blade makes it suitable for cutting through the ground and handling different soil conditions. Understanding its uses, parts, digging techniques, and maintenance methods can help gardeners complete everyday outdoor tasks more effectively. This guide explains how to choose and use a garden spade while avoiding common mistakes.

Table of Contents
What Is a Garden Spade and What Is It Used For?
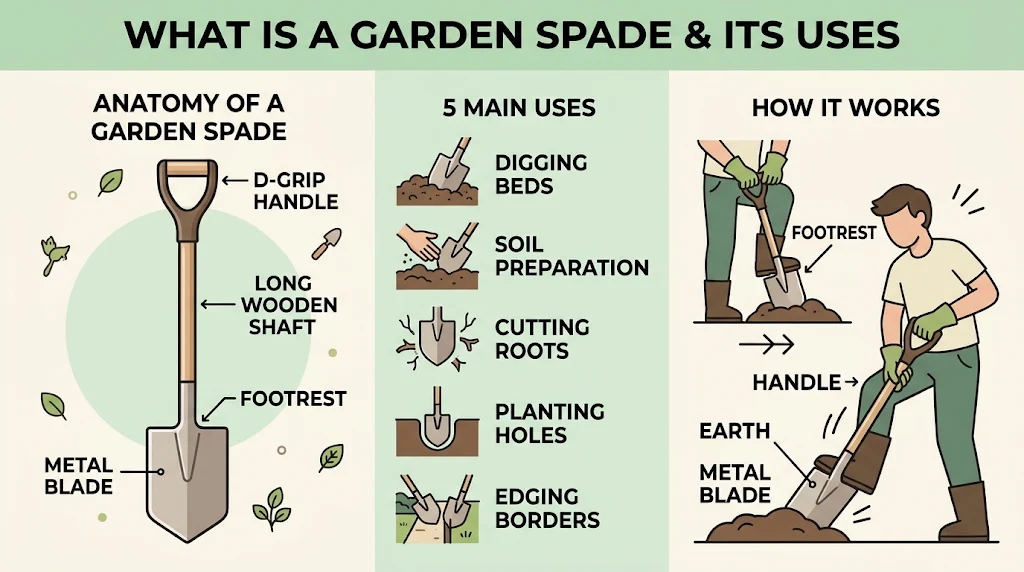
A garden spade is a hand-operated digging tool designed to break compacted soil, prepare planting areas, and move small amounts of earth. It usually has a flat, rectangular or slightly curved metal blade attached to a long handle. Unlike a shovel, which commonly has a rounded or curved blade for lifting loose materials, a spade is better suited to controlled digging and cutting through soil.
Main Uses of a Garden Spade
A garden spade is useful for several everyday gardening tasks. Its flat blade provides control when working around planting areas, making it suitable for both small gardens and larger outdoor spaces.
- Digging garden beds: It helps loosen existing soil before planting flowers, vegetables, and shrubs.
- Soil preparation: Gardeners use it to turn compacted earth and mix organic matter into the upper soil layer.
- Cutting through roots: A strong spade blade can cut small roots when dividing plants or clearing an area. Larger roots may require a different cutting tool.
- Creating planting holes: Its straight edge helps make defined holes for transplanting plants and establishing shrubs.
- Edging garden borders: It can create clean boundaries between lawns, flower beds, and pathways.
How Does a Garden Spade Work?
The blade enters the ground when pressure is applied through the footrest or upper edge. The gardener then pushes the handle backward to loosen and lift the soil. This movement makes spade for digging soil tasks easier when the ground is not excessively hard or rocky.
A well-designed spade handle provides a comfortable grip and better control. Choosing the correct blade size and handle length also helps reduce unnecessary strain during digging.
How to Prepare Garden Soil Using a Spade
Preparing garden soil properly creates better conditions for root growth, water movement, and nutrient absorption. A spade helps loosen compacted ground, remove unwanted weeds, and mix suitable organic materials into the soil. Before digging, check the soil moisture. Working when the ground is extremely wet can damage its structure, while very dry soil may be difficult to break apart.
Clear the Area Before Digging
Remove stones, fallen branches, plastic waste, and existing weeds from the planting area. Cut back unwanted vegetation and remove persistent weed roots where possible. This prevents obstacles from interfering with digging and reduces the chance of unwanted plants growing again.
Break and Loosen the Soil
Place the spade blade vertically into the ground and press down using your foot on the blade’s upper edge. Push the handle backward to loosen a section of earth. Repeat this process across the planting area, breaking large soil clumps without repeatedly crushing the soil into fine particles.
For compacted ground, work in smaller sections rather than forcing the blade too deeply. This makes soil preparation easier and helps maintain a workable soil structure.
Mix Organic Matter into the Soil
Spread a layer of mature compost or well-rotted organic matter over the loosened ground. Use the spade to incorporate it into the upper soil layer, generally around 15–20 cm deep where suitable for the planting area.
Organic matter improves soil structure, supports beneficial soil organisms, and helps sandy soils retain moisture. It can also improve drainage in heavy clay soils over time.
Level the Surface Before Planting
After digging, remove large stones and break apart oversized clumps. Use the flat side of the garden spade to distribute soil evenly and create a level planting surface. Avoid excessive digging when the soil is already loose and healthy.
Practical tip: If soil sticks heavily to the blade or forms shiny, compacted surfaces when pressed, it is probably too wet to work. Allow it to dry slightly before continuing. This helps protect soil structure and makes garden preparation more effective.
Using a Spade to Dig Planting Holes and Garden Beds
A garden spade is useful for preparing planting holes and shaping garden beds before growing flowers, vegetables, shrubs, or small plants. Its flat blade allows gardeners to cut through the soil, remove unwanted earth, and create defined planting spaces. The digging method should depend on the plant’s root size, soil condition, and available growing space.
Digging Planting Holes for Different Plants
Before digging, check the plant’s root ball to estimate the required hole size. For most container-grown plants, make the hole approximately twice as wide as the root ball but no deeper than its height. This gives the roots room to spread into the surrounding soil without burying the plant too deeply.
Use the spade blade to cut around the marked area and loosen the earth. Remove the soil gradually rather than digging one deep section immediately. For trees and shrubs, follow the planting instructions for the particular species because their root requirements can differ.
Creating and Shaping Garden Beds
To prepare a new garden bed, mark its boundaries using string or a garden hose. Insert the garden spade vertically along the marked edges to create clean borders. Remove existing grass and weeds, then loosen the soil inside the area.
For vegetable and flower beds, work the soil only as deeply as necessary for the plants being grown. Mix in mature compost when the soil needs additional organic matter. Avoid walking over freshly loosened ground because repeated pressure can cause compaction.
Tips for Digging in Different Soil Conditions
- Clay soil: Work when slightly moist, not sticky or waterlogged, to avoid damaging its structure.
- Sandy soil: Dig carefully because loose particles can fall back into the planting hole.
- Rocky soil: Remove larger stones individually instead of forcing the blade against them.
- Compacted soil: Loosen smaller sections gradually rather than trying to lift large amounts at once.
Practical tip: Keep the planting hole’s sides slightly rough instead of leaving smooth, polished surfaces. In heavy clay soil, smooth sides can restrict root movement and make it harder for roots to establish in the surrounding ground.
How to Cut Roots and Create Clean Garden Edges
A garden spade can help remove unwanted small roots and create clear boundaries around flower beds, lawns, and planting areas. Its straight metal edge allows gardeners to cut through the soil with control. However, identifying the roots before cutting is important because removing the wrong roots can damage nearby plants or affect their stability.
Cutting Small Roots Without Damaging Plants
Before cutting, inspect the area and identify which roots belong to weeds and which belong to established plants. Use a sharp spade blade to cut small unwanted roots when clearing a planting area or dividing suitable plants.
For better control:
- Remove loose soil around exposed roots to understand their direction.
- Position the blade away from the main stems and root crowns of plants you want to keep.
- Press the blade into the soil with steady foot pressure.
- Remove small sections gradually instead of forcing the blade through thick roots.
A garden spade is suitable for smaller roots, but thick woody roots require an appropriate pruning saw or loppers. Avoid cutting major roots near trees and established shrubs because this can weaken their support and health.
Creating Straight Edges Around Garden Beds
Clean garden borders separate lawns from flower beds and help prevent grass from spreading into planting areas. First, mark the desired boundary using a string line or garden hose.
Place the garden spade vertically along the marked line and press it into the ground. Move along the boundary in short sections, keeping the blade at a consistent depth. Remove excess soil and grass to form a clearly defined edge.
Maintaining Neat Garden Borders
After creating the edge, remove loose grass, weeds, and soil from the border. Check the boundary regularly because lawn grass and creeping plants can gradually grow back into the garden bed.
Practical tip: Avoid digging too close to plant stems when creating borders. Leaving enough space around established plants protects their roots and reduces accidental damage during routine garden maintenance.
Best Soil Conditions for Effective Spade Digging
Soil moisture, texture, and compaction directly affect how easily a spade enters the ground. Digging under unsuitable conditions can require extra effort and damage the soil structure. Understanding when and how to work with different soil types helps gardeners prepare planting areas more effectively.
Check Soil Moisture Before Digging
Soil should generally be slightly moist before digging. Pick up a small handful and squeeze it gently. If it forms a loose ball that breaks apart when touched, the moisture level is usually suitable for working.
- Dry soil: Hard, dry ground can resist the spade blade and make digging difficult. Lightly water the area and allow moisture to spread before starting.
- Wet soil: Sticky soil that forms a firm ball or leaves a shiny surface when squeezed is too wet. Wait until excess moisture drains.
- Moderately moist soil: This condition usually allows the blade to enter more easily without creating excessive compaction.
Understand Different Soil Types
The right digging approach depends on the soil’s texture and structure.
Clay Soil: Heavy clay holds water and can become extremely hard when dry. Work when slightly moist, using smaller sections to avoid creating dense clumps.
Sandy Soil: Sandy ground is easier to dig because its particles are loose. However, it dries quickly and may need compost to improve moisture retention.
Loamy Soil: Loam contains a balanced mixture of sand, silt, and clay. It is generally easier to dig and suitable for many garden plants.
Avoid Digging When Soil Is Waterlogged
Walking or digging on saturated ground can squeeze air spaces out of the soil, damaging its structure. This can restrict root growth and reduce water movement. Wait until the ground becomes workable before using a garden spade.
Choose the Right Digging Depth
Not every planting area requires deep digging. For many annual flowers and vegetable beds, loosening the upper 15–30 cm of soil is sufficient, depending on the crop and existing soil condition. For established trees and shrubs, avoid unnecessary digging around their root zones.
Practical tip: If the soil sticks heavily to the blade or your footwear, postpone digging. Waiting for suitable moisture conditions can save effort and help maintain healthy garden soil.
Common Mistakes to Avoid When Using a Garden Spade
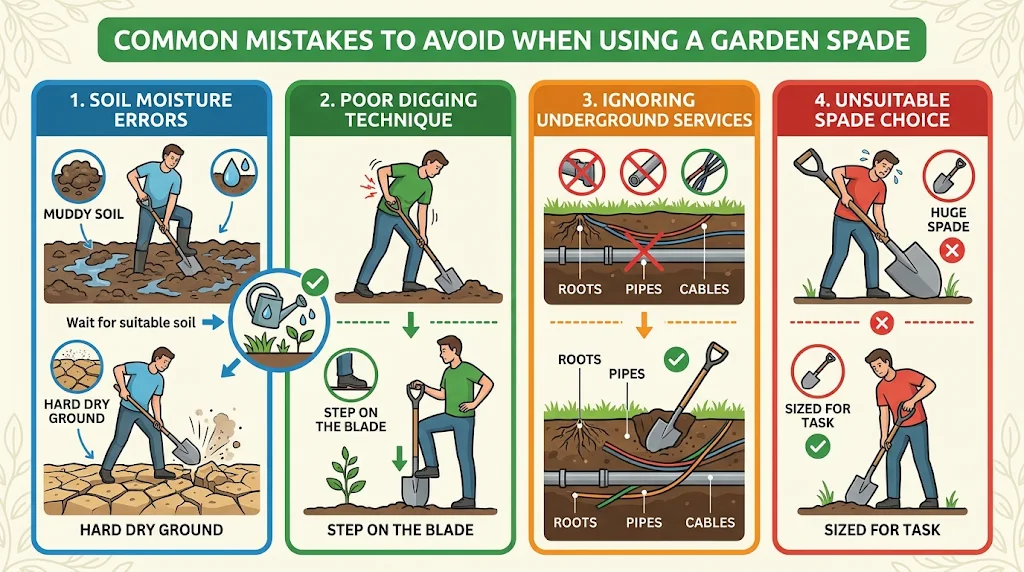
Using a garden spade incorrectly can make digging harder, damage plant roots, and reduce the tool’s working life. Understanding common mistakes helps gardeners work more safely and achieve better results.
Digging When the Soil Is Too Wet or Dry
Extremely wet soil sticks to the blade and becomes compacted under pressure. Very dry soil can be hard enough to make digging difficult. Check the moisture level before starting and wait until the ground is suitable for working.
Using the Wrong Digging Technique
Forcing the spade blade into hard ground with excessive body weight can cause strain and damage the tool. Instead, place your foot firmly on the blade’s upper edge and apply steady pressure. Work in smaller sections when the soil is difficult to break.
Ignoring Underground Roots and Pipes
Digging without checking what lies beneath the surface can damage irrigation lines, electrical cables, and established plant roots. Check for underground services before starting deeper digging, and avoid cutting major roots of trees and shrubs.
Choosing an Unsuitable Spade
A heavy spade or uncomfortable spade handle can make extended gardening work difficult. Select a suitable blade size and handle length for the task, and avoid using a digging spade for jobs that require a different tool.
How to Clean, Store, and Maintain a Garden Spade
Regular maintenance keeps a garden spade functional and helps prevent rust, dirt buildup, and unnecessary wear. Cleaning it after use also makes the tool easier to handle during future gardening tasks.
Remove Soil and Plant Residue
After digging, use a stiff brush to remove dried soil, mud, and plant material from the blade. For stubborn dirt, rinse it with water and wipe away remaining residue. Pay attention to the connection between the blade and handle, where soil can accumulate.
Dry and Protect the Metal Blade
Wipe the blade thoroughly with a dry cloth after cleaning. Leaving moisture on metal surfaces can encourage rust. Once completely dry, apply a thin layer of suitable protective oil if the manufacturer recommends it.
Check the Blade and Handle Regularly
Inspect the spade blade for cracks, excessive rust, bending, or a loose connection. Check wooden handles for splinters and cracks, and examine other handle materials for damage. Tighten or repair loose fittings before using the tool again.
Sharpen the Blade When Necessary
A blunt blade requires more effort to enter compacted soil. Use a suitable metal file to maintain the original cutting angle, following the manufacturer’s instructions. Wear protective gloves and safety glasses while sharpening.
Store the Spade in a Dry Place
Keep the garden spade in a dry shed or storage area. Hang it securely or place it where the blade cannot cause accidental injuries. Avoid leaving it outdoors in rain or direct contact with wet ground.
Practical tip: Inspect the blade and handle before each gardening session. Finding loose fittings, rust, or cracks early can prevent tool failure during use.
Conclusion
A garden spade is useful for preparing soil, digging planting holes, removing small roots, and maintaining neat garden borders. Choosing the correct blade and handle, working under suitable soil conditions, and using proper digging techniques can make gardening tasks easier. Regular cleaning, sharpening, and safe storage also help maintain the tool’s condition. With the right approach, a spade for gardening can remain a practical tool for everyday garden maintenance.
Top 5 Frequently Asked Questions (FAQs)
Q1. What is a garden spade used for?
A garden spade is used for digging soil, preparing planting beds, removing small roots, transplanting plants, and creating clean garden edges.
Q2. What is the difference between a garden spade and a shovel?
A spade usually has a flat, straight-edged blade for cutting and digging soil, while a shovel generally has a curved blade designed for lifting and moving loose materials.
Q3. When is the best time to dig garden soil with a spade?
The best time is when the soil is slightly moist. Avoid digging waterlogged or extremely dry ground because it can make digging difficult and damage soil structure.
Q4. How deep should you dig with a garden spade?
For many flower and vegetable beds, loosening the upper 15–30 cm of soil is sufficient. The required depth depends on the plant’s root system and soil conditions.
Q5. How do you maintain a garden spade?
Remove soil after each use, dry the blade, sharpen its edge when necessary, inspect the handle for damage, and store the tool in a dry place.