
Introduction
Coping saw parts play an important role in making accurate cuts through curved shapes, patterns, and detailed woodworking designs. Each component has a specific function, from supporting the blade to controlling its movement during cutting. Understanding these components helps woodworkers identify their purposes, recognize common problems, and maintain the tool properly. This guide explains the main components, their functions, common problems, and replacement methods.

Table of Contents
Coping Saw Components and Their Functions
A coping saw uses a simple but carefully designed structure to make curved cuts, internal openings, and detailed shapes in wood. Each component has a specific purpose, from holding the blade firmly to controlling its direction during cutting. Understanding these components helps users operate the tool correctly, identify worn parts, and choose suitable replacements.
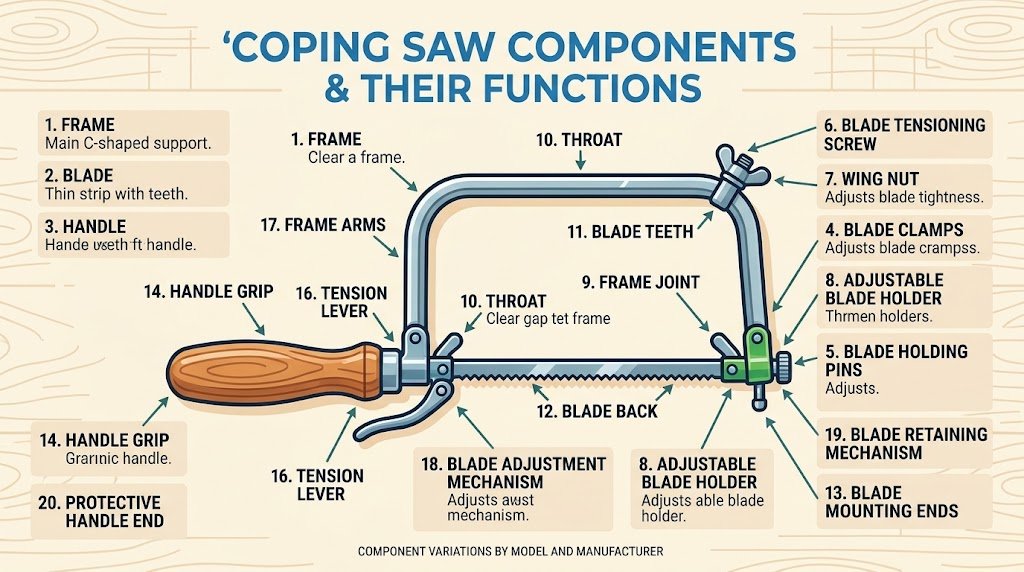
1. Frame
The coping saw frame is the main supporting structure. It usually has a C-shaped design that holds the blade between two ends. Its rigidity helps maintain blade tension and keeps the blade properly positioned during cutting.
2. Blade
The coping saw blade is a thin, narrow metal strip with small teeth along one edge. It removes wood as the user pushes and pulls the saw. Different blade sizes and tooth arrangements are available for different materials and cutting requirements.
3. Handle
The handle provides a grip for controlling the saw. It is commonly made from wood or plastic and allows the user to guide the blade through straight, curved, and intricate cutting paths.
4. Blade Clamps
Blade clamps hold the blade at both ends. They prevent unwanted movement and help keep the blade securely attached to the frame during operation.
5. Blade Holding Pins
Some coping saw designs use small blade holding pins to secure compatible blades. These fittings connect the blade ends to the holders and help prevent accidental release.
6. Blade Tensioning Screw
The tensioning screw adjusts how tightly the blade is stretched across the frame. Correct blade tension helps prevent excessive bending and supports controlled cutting.
7. Wing Nut
A wing nut is a hand-adjustable fastener found on certain models. It can help secure blade fittings or adjust tension without requiring a separate wrench.
8. Adjustable Blade Holder
This fitting supports the blade and allows its position or angle to be changed on compatible saws. It is useful when cutting patterns that require different blade orientations.
9. Frame Joint
The frame joint connects structural sections of the saw. Strong connections help the frame remain stable when pressure is applied during cutting.
10. Throat
The throat is the open distance between the blade and the back of the frame. It determines how far the saw can reach into a workpiece and is important when cutting large patterns.
11. Blade Teeth
Blade teeth are the small cutting points along the blade. Their size, spacing, and arrangement influence how quickly and smoothly the saw removes material.
12. Blade Back
The blade back is the smooth edge opposite the teeth. It provides structural support and helps identify the cutting direction of the blade.
13. Blade Mounting Ends
These are the two ends of the blade that fit into the holding mechanism. Proper installation keeps the blade straight and securely positioned.
14. Handle Grip
The handle grip is the surface where the fingers and palm hold the tool. Its shape and material influence comfort and control during extended woodworking tasks.
15. Handle Screw
Some models use a handle screw to attach the handle to the frame. It keeps the handle securely connected and reduces unwanted movement.
16. Tension Lever
A tension lever is available on certain coping saw designs. It helps apply or release blade tension, making blade installation and removal easier.
17. Frame Arms
The frame arms are the two extended sides of the C-shaped structure. They support the blade holders and help maintain the required distance between the blade ends.
18. Blade Adjustment Mechanism
This mechanism allows the blade position or orientation to be changed on suitable models. It helps users make cuts from different directions without unnecessarily turning the workpiece.
19. Blade Retaining Mechanism
The retaining mechanism consists of the fittings that keep the blade attached to the frame. Depending on the design, it may include clamps, pins, or threaded fasteners.
20. Protective Handle End
Some handles have a reinforced or protective end. This feature helps protect the handle material from damage and may improve its durability.
Note: These 20 names describe components, fittings, and design features. Not every coping saw has all of them as separate parts. Construction varies by model and manufacturer.
Understanding the Coping Saw Frame and Its Design
The frame is one of the most important structural components of a coping saw. It supports the blade, maintains the required distance between its ends, and helps the user control cutting movements. Most coping saws have a deep C-shaped frame that provides an open working area for cutting curves, internal shapes, and detailed patterns in wood.
C-Shaped Frame Construction
A typical coping saw frame has a curved back and two extended arms. The blade connects to the front ends of these arms, while the curved section provides structural support.
This design creates an open space between the blade and the back of the frame. This space is called the throat, and its depth determines how far the blade can reach into a wooden workpiece.
Materials Used in Coping Saw Frames
Manufacturers use different materials depending on the saw’s design and intended use.
- Steel frame: Provides strength and rigidity, helping the saw maintain its shape under normal cutting pressure.
- Aluminium frame: Offers a lighter structure that can be easier to handle during detailed woodworking.
- Tubular metal frame: Uses a hollow metal construction to balance weight and structural support.
The frame should be sufficiently rigid to resist bending when the blade is tightened.
How the Frame Maintains Blade Tension
The frame holds the blade between two mounting points. When the blade is tightened, the frame supports the pulling force that keeps it straight during operation.
Proper blade tension is important because a loose blade may twist or bend while cutting. However, excessive tension can place unnecessary stress on the frame and blade fittings.
Frame Depth and Cutting Capacity
The depth of the frame affects the size of the workpiece that can fit inside the saw.
A deeper saw frame provides more room for working on larger wooden patterns, while a smaller frame may be suitable for compact projects. Users should consider throat depth when selecting a coping saw for particular woodworking tasks.
How Frame Design Affects Cutting Accuracy
A stable frame helps maintain the blade’s position during repeated push-and-pull movements. If the frame bends, the blade may become difficult to control, especially when following tight curves.
For better results, keep the frame properly aligned, avoid applying excessive pressure, and check that both blade ends are securely fitted before starting work.
Signs of Frame Damage
Inspect the frame regularly for bent arms, loose joints, cracks, and damaged blade mounting points. A damaged frame may not maintain proper blade tension and can affect cutting accuracy. Replace the saw if its structural damage makes it unsafe to use.
How the Coping Saw Handle Provides Control and Comfort
The handle is an important part of a coping saw because it connects the user’s hand to the cutting action. Its shape, material, size, and position affect how comfortably the saw can be held and how accurately the blade can follow a cutting line. A properly designed handle helps users guide the saw through curved patterns, narrow sections, and detailed woodworking projects without losing control.
1. Handle Shape and Grip Design
Most coping saws have a rounded or cylindrical handle that allows the user to hold the tool comfortably. Some handles are slightly shaped to fit the palm, while others have a simple straight design.
A well-designed handle grip provides enough contact with the hand to guide the blade without requiring excessive gripping force. This is particularly useful when making small curves or changing the cutting direction.
2. Materials Used in Coping Saw Handles
Manufacturers use different materials to produce handles. Each material has its own characteristics.
- Wooden handles: Common in traditional coping saws. They provide a natural grip and can feel comfortable during extended use.
- Plastic handles: Lightweight and generally easy to clean. Their surface may include textured sections for better grip.
- Rubber-coated handles: Often provide additional friction between the hand and handle, helping reduce slipping.
- Composite handles: Combine different materials to balance strength, weight, and comfort.
The best choice depends on personal preference, handle design, and the type of woodworking being performed.
3. How the Handle Improves Cutting Control
The handle allows users to guide the blade along a marked cutting line. When cutting curves, the user can make small adjustments to the saw’s direction while maintaining a steady grip.
Good control is especially important when working with delicate patterns, thin wooden pieces, and tight curves. Instead of forcing the blade through the material, use smooth, controlled push-and-pull movements.
4. Handle Position and Wrist Movement
The position of the handle affects the angle at which the saw is held. A suitable position allows the wrist to remain relatively comfortable while the blade moves through the workpiece.
During detailed cutting, avoid bending the wrist excessively. Keep the workpiece properly supported and adjust its position when necessary rather than forcing your hand into an uncomfortable angle.
5. Handle Size and Hand Comfort
A handle should fit the user’s hand properly. A handle that is too thick may make it difficult to maintain a secure grip, while one that is too narrow may require unnecessary gripping pressure.
Consider these factors when selecting a coping saw:
- Handle diameter and overall length
- Surface texture and material
- Weight and balance of the complete saw
- Comfort during repeated cutting movements
6. Handle Maintenance and Care
Regular maintenance helps preserve the handle’s condition and usability.
For wooden handles, keep the surface clean and dry to reduce moisture damage and cracking. Plastic and rubber handles can be cleaned with a slightly damp cloth and dried before storage.
Also inspect the handle screw and attachment point if your model uses one. A loose connection can cause unwanted movement during cutting. Tighten suitable fasteners according to the manufacturer’s instructions.
7. Common Handle Problems
| Problem | Possible cause |
|---|---|
| Slippery grip | Dust, moisture, or worn surface |
| Loose handle | Loose fastening or damaged attachment |
| Cracked wooden handle | Age, impact, or moisture changes |
| Uncomfortable grip | Incorrect handle size or shape |
A comfortable handle does not make the blade cut by itself, but it helps the user maintain better control and reduce unnecessary hand strain. Choosing a suitable grip and keeping it in good condition can make detailed woodworking more manageable.
How Coping Saw Components Work Together
A coping saw works through the combined action of its frame, blade, handle, and blade-holding mechanism. Each component performs a different job, but all must work together to produce controlled and accurate cuts. Understanding how these coping saw components interact helps users operate the tool correctly, identify problems, and achieve better results in woodworking.
1. The Frame Supports the Entire Cutting System
The coping saw frame provides the main structure of the tool. Its C-shaped design holds the blade between two ends and creates enough open space for the workpiece.
When the blade is tightened, the frame supports the tension required to keep it straight. A rigid frame also helps prevent unwanted movement during cutting.
2. The Blade Performs the Cutting Action
The coping saw blade is responsible for removing material from the workpiece. Its small teeth cut through wood as the user moves the saw backward and forward.
Different blades have different tooth sizes and spacing. Fine teeth are generally suitable for detailed cuts, while coarser teeth can remove material more quickly from suitable workpieces.
3. Blade Holders Keep the Blade Secure
Blade clamps, pins, and other fittings connect the blade to the frame. Their main purpose is to prevent the blade from slipping or becoming loose during operation.
Correct installation is important. If the blade is not properly secured at both ends, it may twist, move out of alignment, or detach during use.
4. The Tensioning Mechanism Keeps the Blade Stable
The blade tensioning screw or another adjustment mechanism controls how tightly the blade is held.
Proper blade tension helps the blade remain straight when pressure is applied. Too little tension can allow excessive bending, while too much tension may damage the blade or place unnecessary stress on the frame.
5. The Handle Controls the Saw’s Movement
The handle allows the user to guide the blade through the material. It provides a secure gripping point for controlling the direction and movement of the saw.
During cutting, the user applies gentle forward and backward movements. The handle helps maintain control while following straight lines, curves, and intricate patterns.
6. How All Components Work During Cutting
The cutting process involves several connected actions:
- The frame holds the blade in position.
- The blade holders secure both blade ends.
- The tensioning mechanism keeps the blade sufficiently tight.
- The handle allows the user to guide the saw.
- The blade teeth remove small amounts of wood during each cutting movement.
- The open throat provides space for moving the saw around the workpiece.
When these components are correctly assembled, they create a stable cutting system suitable for detailed woodworking.
7. Why Proper Component Alignment Matters
All parts must be correctly positioned for smooth operation. A misaligned blade may cut at an unintended angle, while loose fittings can affect stability.
Before starting, check that:
- The blade is securely attached at both ends.
- The teeth face the correct cutting direction according to the blade design.
- The frame is not bent or damaged.
- The tension is appropriate for the installed blade.
- The handle and its connection are secure.
8. What Happens When One Component Fails?
A problem with one component can affect the performance of the entire saw. For example, a loose blade holder may allow the blade to move, while a damaged frame may fail to maintain proper tension. Worn blade teeth can also make cutting slower and require more effort.
Regular inspection and suitable maintenance help keep the tool working properly. If a structural component is cracked or damaged, replace the saw or the affected part before using it again.
Common Problems With Coping Saw Parts and Their Solutions
A coping saw may develop problems after regular use, incorrect blade installation, or poor maintenance. These issues can affect cutting accuracy, blade stability, and user comfort. Understanding common faults in coping saw components helps users identify the cause and take suitable corrective action before continuing their woodworking projects.
1. Loose or Wobbly Blade
A loose blade may move from side to side instead of following a straight cutting path. This problem often occurs when blade clamps are not tightened properly or the tensioning mechanism is incorrectly adjusted.
Solution: Check both blade ends and secure them correctly. Adjust the tension gradually according to the manufacturer’s instructions. Replace damaged clamps if they cannot hold the blade securely.
2. Blade Keeps Breaking
Frequent blade breakage can result from excessive tension, incorrect installation, worn blade holders, or forcing the saw through thick material.
Solution: Install a suitable blade, apply appropriate tension, and use gentle cutting movements. Avoid twisting the blade sideways or applying excessive pressure.
3. Bent or Damaged Frame
A bent coping saw frame can prevent the blade from remaining properly aligned. It may also make maintaining correct tension difficult.
Solution: Inspect the frame for bending, cracks, or damaged joints. Do not attempt to use a structurally damaged saw. Replace it if the frame cannot safely support the blade.
4. Blade Slipping From Its Holders
Blade slipping usually happens when the clamps, pins, or mounting points become loose or worn.
Solution: Clean the mounting areas and check the fittings for damage. Tighten suitable fasteners and replace worn retaining components with compatible parts.
5. Difficult Blade Tension Adjustment
A stiff or difficult tensioning screw may result from accumulated dust, corrosion, or damaged threads.
Solution: Remove dirt from the adjustment area and inspect the screw. Use only a lubricant suitable for the mechanism and follow the manufacturer’s maintenance instructions. Replace damaged fasteners.
6. Uncomfortable or Slippery Handle
A slippery handle grip can reduce control during detailed cutting. Dust, moisture, worn surfaces, or damaged handle material may cause this problem.
Solution: Clean and dry the handle before use. Replace cracked or badly worn handles and check that the handle connection is secure.
7. Blade Cuts Unevenly
Uneven cutting may occur because of dull blade teeth, incorrect blade positioning, or excessive pressure during sawing.
Solution: Inspect the blade and replace it if its teeth are worn or damaged. Install it in the correct direction and use steady movements without forcing the saw.
8. Rust on Metal Components
Moisture and improper storage can cause rust on the blade, frame, and other metal fittings. Rust may weaken components and interfere with adjustment.
Solution: Remove light surface rust using a suitable cleaning method. Dry all metal parts thoroughly after cleaning and apply a thin protective coating where appropriate.
9. Loose Handle Connection
A loose handle can move during cutting and make the saw difficult to control. This may happen because of a loose screw or damaged attachment point.
Solution: Check the handle fastener and tighten it if appropriate. If the handle or its mounting point is cracked, replace the damaged component before using the saw.
10. Reduced Cutting Performance
When a coping saw becomes difficult to move through wood, the problem may involve dull teeth, an unsuitable blade, incorrect tension, or poor cutting technique.
Solution: Select a blade appropriate for the material and cutting task. Check its condition, confirm correct installation, and allow the teeth to cut without applying unnecessary force.
Important Maintenance Advice
Inspect the saw before each project, especially its frame, blade holders, tensioning mechanism, and handle. Store it in a dry place and remove wood dust after use. Never continue working with a cracked frame, loose blade fittings, or a damaged blade because these conditions can cause the tool to fail during cutting.
How to Maintain and Replace Coping Saw Components
Regular maintenance helps keep a coping saw safe, stable, and suitable for detailed woodworking. Its frame, blade, handle, and adjustment fittings can collect dust, develop rust, or become loose through repeated use. Proper cleaning and timely replacement of worn components help maintain cutting accuracy and reduce the risk of tool failure.
1. Clean the Blade After Each Use
Wood dust, resin, and small debris can collect between the blade teeth during cutting. This buildup may affect cutting performance and make the blade harder to clean later.
- Remove loose dust with a soft brush.
- Wipe the blade carefully with a dry cloth.
- Use a suitable cleaner for stubborn resin deposits.
- Dry the blade completely before storage.
Avoid touching sharp teeth directly while cleaning.
2. Inspect the Frame for Damage
The coping saw frame supports the blade and maintains its tension. Check it regularly for cracks, bending, corrosion, and loose joints.
A damaged frame may not hold the blade securely. Do not straighten a cracked or severely bent frame by force. Replace the saw if its structure is no longer safe to use.
3. Check and Maintain Blade Tension
Correct blade tension helps the blade remain stable during cutting. A blade that is too loose may bend or twist, while excessive tension can damage the blade or its fittings.
Check the tensioning screw, wing nut, or lever according to the saw’s design. Adjust it gradually and follow the manufacturer’s instructions.
4. Maintain the Handle and Grip
The handle provides control during repeated cutting movements. Dust, moisture, and damaged surfaces can make it uncomfortable or difficult to hold.
- Clean wooden and plastic handles with suitable materials.
- Keep the grip dry before use.
- Check for cracks and loose connections.
- Replace a damaged handle instead of continuing with an unstable grip.
5. Inspect Blade Clamps and Holding Pins
Blade clamps and blade holding pins secure the blade to the frame. Worn or damaged fittings may allow the blade to slip during operation.
Check both mounting points for loose fasteners, damaged threads, and visible wear. Replace faulty fittings with compatible components designed for your particular saw model.
6. How to Replace a Coping Saw Blade
A worn or broken blade should be replaced before starting another project.
- Release the blade tension using the saw’s adjustment mechanism.
- Carefully remove the old blade from both holders.
- Select a replacement blade compatible with the frame.
- Position the new blade correctly in the mounting points.
- Confirm that the teeth face the intended cutting direction.
- Tighten the blade gradually until it is properly tensioned.
- Check that both ends are secure before cutting.
Always follow the manufacturer’s instructions because blade attachment systems differ between models.
7. Replace Worn or Damaged Components
Some parts can be replaced individually, while others may require replacing the complete saw.
| Component | When replacement may be needed |
|---|---|
| Blade | Broken, dull, bent, or damaged teeth |
| Blade clamps | Worn gripping surfaces or damaged threads |
| Holding pins | Bent, broken, or loose fittings |
| Handle | Cracks or an unstable connection |
| Tensioning screw | Damaged threads or failed adjustment |
| Frame | Cracks or severe structural damage |
Before purchasing replacement parts, check the manufacturer’s model information and compatibility requirements.
8. Protect Metal Parts From Rust
Metal components can develop rust when exposed to moisture for long periods. After cleaning, dry the blade, frame, and fittings thoroughly. Apply a light protective coating suitable for woodworking tools where appropriate, and remove excess residue before cutting.
9. Store the Saw Correctly
Proper storage protects the coping saw components from unnecessary damage.
- Keep the saw in a dry storage area.
- Avoid placing heavy objects on its frame.
- Protect the blade from accidental contact.
- Store replacement blades in a suitable container.
- Keep the tool away from damp surfaces.
10. Perform a Safety Check Before Use
Before every project, inspect the blade, frame, handle, and mounting mechanism. Make sure the blade is correctly installed and securely held. Replace damaged parts before using the tool.
Consistent maintenance helps extend the useful life of a coping saw and supports safer, more controlled woodworking.
Conclusion
Understanding the different components of a coping saw helps users work more confidently and achieve better woodworking results. The frame provides support, the blade performs the cutting, and the handle allows controlled movement. Proper blade tension, secure fittings, and regular maintenance also contribute to reliable performance. By inspecting worn components, replacing damaged parts, and storing the tool correctly, woodworkers can keep their coping saw in good working condition for future projects.
Top 5 Frequently Asked Questions (FAQs)
Q1. What are the main parts of a coping saw?
The main parts include the frame, blade, handle, blade holders, tensioning screw, and blade clamps.
Q2. What is the function of a coping saw frame?
The frame supports the blade, maintains tension, and provides space for cutting inside wooden workpieces.
Q3. What does the blade do on a coping saw?
The blade cuts wood using its small teeth, allowing users to create curves, patterns, and detailed shapes.
Q4. How do you adjust the tension on a coping saw blade?
Use the tensioning screw, wing nut, or adjustment mechanism to tighten the blade according to the manufacturer’s instructions.
Q5. When should a coping saw blade be replaced?
Replace the blade when it becomes dull, bent, broken, or damaged, or when it no longer cuts smoothly.