
Introduction
A mini miter saw is an excellent choice for anyone who needs accurate and clean angle cuts for woodworking, trim installation, crafts, and DIY projects. Its compact design, precision, and ease of use make it a practical tool for beginners and experienced users alike. In this guide, you’ll learn how these tools work, their different types, common applications, important features, advantages, safety practices, maintenance tips, and how to choose the right model for your needs.
Table of Contents
What Is a Mini Miter Saw?
A small miter saw is a compact cutting tool designed to make precise crosscuts and angled cuts on small workpieces. It is commonly used for detailed woodworking, trim work, model making, crafts, and other projects that require clean and accurate cuts. Its smaller size makes it easier to handle, transport, and store than a standard miter saw while still delivering excellent cutting precision.
Unlike larger workshop saws, these compact cutting tools are built for lighter materials and smaller dimensions. They are suitable for cutting molding, dowels, hardwood, softwood, plastic, and other materials commonly used in DIY and woodworking projects. Many models include adjustable angle settings for precise bevel and corner cuts.
Whether you are working on decorative projects, home improvements, or furniture repairs, this type of saw offers better control and greater accuracy than many handheld cutting tools. It is especially useful for anyone looking for a reliable cutting solution without sacrificing valuable workspace.
Because of its precision, portability, and ease of use, this tool has become a popular choice among DIY enthusiasts, hobbyists, woodworkers, and professionals who regularly handle small-scale cutting tasks.
Types of Mini Miter Saws
Choosing the right type depends on your projects, workspace, and cutting needs. Each option offers unique advantages, making it suitable for different users and applications.
1. Manual Miter Saws
Manual models rely on hand-operated cutting rather than electricity. They are lightweight, affordable, and perfect for small DIY projects that require precise angle cuts. These tools are commonly used for cutting molding, plastic trim, lightweight wood, and hobby materials.
Best for:
- Crafts and hobby projects
- Picture frames
- Light trim work
- Occasional home use
2. Electric Miter Saws
Electric models use a powered motor to deliver faster and more consistent cutting performance. They are capable of handling a wider range of materials while producing clean, accurate cuts with minimal effort. Many include adjustable angle settings for improved precision.
Best for:
- Woodworking projects
- Home renovations
- Furniture building
- Frequent cutting tasks
3. Cordless Miter Saws
Cordless versions operate on rechargeable batteries, allowing users to work without being restricted by a power cord. Their portability makes them ideal for jobsites, outdoor projects, and locations where electrical outlets are unavailable.
Best for:
- Portable work
- Remote job sites
- Quick installations
- DIY enthusiasts
4. Sliding Miter Saws
Sliding models feature rails that allow the blade to move forward and backward during a cut. This design increases the cutting capacity, making it easier to work with wider boards while maintaining excellent accuracy.
Best for:
- Wider boards
- Shelving
- Decorative trim
- Cabinet components
5. Compound Miter Saws
Compound models can make both miter and bevel cuts, making them highly versatile for projects that require angled joints. They are commonly chosen for finish carpentry, molding installation, and detailed woodworking.
Best for:
- Crown molding
- Baseboards
- Furniture making
- Precision joinery
Which Type Should You Choose?
The right choice depends on the materials you cut, the level of precision you need, and how often you use the tool. Manual options are ideal for light-duty projects, while electric and cordless models offer greater speed and convenience. If your work frequently involves wider boards or complex angled cuts, sliding or compound designs provide the versatility needed for professional-quality results.
Common Applications
Compact miter cutting tools are designed for accuracy, making them useful for a wide range of home improvement, woodworking, and creative projects. Their ability to produce clean, consistent cuts helps users complete detailed work with greater precision and less effort.
Crafts and DIY Projects
These tools are widely used for creating decorative items, handmade gifts, signs, ornaments, and other craft projects. Their precise angle-cutting capability helps produce professional-looking results when working with small pieces of wood, plastic, or lightweight materials.
Trim and Molding Installation
One of the most common uses is cutting baseboards, door casing, window trim, and decorative molding. Accurate miter cuts create tight-fitting corners that improve the appearance of finished interiors.
Woodworking Projects
Woodworkers use these saws to cut small boards, dowels, hardwood, softwood, and other materials for furniture, shelves, boxes, and custom wood projects. Their precision makes assembling parts easier and reduces material waste.
Picture Frames and Decorative Frames
Creating picture frames requires accurate 45-degree cuts so each corner joins perfectly. This type of saw provides the consistency needed for attractive, well-aligned frames used in homes, offices, and workshops.
Model Making and Hobby Work
Model builders and hobbyists rely on precise cutting tools when working with miniature wooden parts, plastic components, and lightweight materials. Clean cuts improve both the appearance and fit of detailed projects.
Home Repairs and Renovation
Small renovation tasks often require cutting trim, molding, flooring accessories, or replacement wood pieces. A compact cutting tool makes these jobs faster while maintaining clean, accurate edges.
Educational and Workshop Projects
Schools, training centers, and woodworking workshops frequently use compact cutting equipment to teach measuring, angle cutting, and basic woodworking techniques. Their manageable size makes them suitable for learning environments under proper supervision.
Light Construction Tasks
Although not intended for heavy-duty construction, these tools are useful for cutting smaller construction materials used in finishing work, interior installations, and custom carpentry where precision is more important than cutting capacity.
Key Features to Consider
Choosing the right cutting tool requires more than comparing prices or designs. Understanding the most important features helps you select a model that matches your projects, improves cutting accuracy, and offers long-term reliability.
Blade Size
Blade size determines the maximum thickness and width of the material that can be cut. Smaller blades are ideal for crafts, trim, and detailed woodworking, while larger blades can handle thicker stock. Select a blade size that suits the type of projects you complete most often.
Motor Power
Motor power affects cutting speed and overall performance. A more powerful motor provides smoother cuts through hardwood and dense materials with less effort. For occasional DIY tasks, a lower-powered model may be sufficient, while frequent users benefit from higher power output.
Cutting Capacity
Cutting capacity refers to the maximum dimensions of the material the tool can handle in a single pass. Always check the manufacturer’s specifications to ensure the tool can accommodate the boards, trim, or molding you plan to cut.
Miter Angle Range
An adjustable miter angle allows accurate cuts at different degrees for corners, frames, and trim installation. Models with clearly marked angle settings and secure locking mechanisms make it easier to achieve consistent results.
Bevel Cutting Capability
Some models allow the blade to tilt for bevel cuts in addition to standard miter cuts. This feature is valuable for projects involving crown molding, decorative trim, and complex woodworking joints.
Build Quality
A sturdy frame reduces vibration and improves cutting accuracy. Durable materials such as aluminum or reinforced steel provide better stability and help extend the lifespan of the tool, especially with regular use.
Safety Features
Safety should always be a priority. Look for features such as a blade guard, trigger safety lock, electric brake, secure work clamp, and overload protection. These features help reduce the risk of accidents while improving user confidence.
Dust Collection System
Cutting wood creates dust that can affect visibility and leave your workspace untidy. A dust bag or dust port helps collect debris, making cleanup easier and maintaining a healthier working environment.
Portability and Weight
If you frequently move between job sites or have limited workshop space, choose a lightweight model with a comfortable carrying handle. Portable designs are easier to transport, store, and set up whenever needed.
Ease of Adjustment
Quick and accurate adjustments save time during a project. Easy-to-read measurement scales, smooth angle adjustments, and simple blade replacement systems improve efficiency and make the tool more convenient to use.
Warranty and Customer Support
A reliable warranty reflects the manufacturer’s confidence in the product. Good customer support and easy access to replacement parts can also make maintenance and repairs much simpler over the life of the tool.
Advantages and Limitations
Understanding both the strengths and weaknesses of this cutting tool helps you decide whether it is the right choice for your projects. While it offers excellent precision for small-scale work, it also has certain limitations compared to larger workshop equipment.
Advantages
High Cutting Accuracy
These tools are designed to produce clean, precise crosscuts and angled cuts. This level of accuracy is especially valuable for trim installation, furniture components, crafts, and decorative woodworking.
Compact and Space-Saving
Their small footprint makes them ideal for workshops with limited space. They are also easy to store when not in use.
Lightweight and Portable
Most models are easy to carry between work locations, making them suitable for home users, DIY enthusiasts, and professionals who need a portable cutting solution.
Easy to Operate
Simple controls and straightforward adjustments make these saws suitable for beginners while still providing the precision experienced users expect.
Cleaner Finishing Cuts
With the right blade and proper setup, they produce smooth edges that often require little sanding before assembly or finishing.
Limitations
Limited Cutting Capacity
Because of their compact design, they cannot handle very thick or wide boards as effectively as full-size workshop saws.
Not Designed for Heavy-Duty Work
They perform best on light to medium-duty tasks. Large construction projects or continuous commercial use may require a more powerful machine.
Fewer Advanced Features
Entry-level models may not include sliding rails, dual bevel capability, laser guides, or advanced dust collection systems.
Blade Size Restrictions
Smaller blades limit the maximum depth and width of each cut, making them less suitable for oversized materials.
Material Compatibility
Although they can cut many types of wood and similar materials, some models are not intended for metal, masonry, or other specialized materials unless equipped with the correct blade.
How to Choose the Right Model
Selecting the right model of meter saw or chain saw depends on the type of work you perform, the materials you cut, and the features that matter most for your projects.
Consider Your Projects
Start by identifying the tasks you perform most often. Craft projects, woodworking, trim installation, and furniture building all have different cutting requirements.
Check the Cutting Capacity
Choose a model that can comfortably cut the thickness and width of the materials you normally use. Buying a tool with adequate capacity prevents unnecessary limitations later.
Evaluate Motor Performance
A stronger motor provides smoother cutting through hardwood and dense materials while maintaining consistent performance during extended use.
Select the Appropriate Blade
Different blades are designed for different materials. Fine-tooth blades produce smoother finishes, while blades with fewer teeth remove material more quickly.
Look for Adjustable Angles
Clear angle markings and secure locking mechanisms improve accuracy when making repeated miter cuts for frames, molding, and trim.
Prioritize Safety
Essential safety features such as blade guards, trigger locks, workpiece clamps, and electric brakes help reduce the risk of accidents.
Consider Portability
If you frequently move your equipment, select a lightweight design with a comfortable carrying handle and a stable base.
Review Build Quality
A durable frame made from quality materials provides better stability, reduces vibration, and extends the tool’s lifespan.
Compare Warranty and Support
A good warranty and reliable customer service offer added confidence and make future maintenance easier if replacement parts are needed.
How to Use It Safely
Safe operation not only reduces the risk of injury but also improves cutting accuracy and extends the life of the tool. Following basic safety practices should always be a priority.
Read the User Manual
Become familiar with the manufacturer’s operating instructions before using the tool. Understanding its controls and safety features helps prevent mistakes.
Wear Protective Equipment
Always wear safety glasses to protect your eyes from flying debris. Hearing protection and a dust mask are also recommended during extended cutting sessions.
Inspect the Tool Before Use
Check that the blade is sharp, properly installed, and free from damage. Ensure all guards and moving parts operate correctly before starting.
Secure the Workpiece
Clamp or firmly support the material before cutting. A stable workpiece improves accuracy and helps prevent unexpected movement.
Keep Hands Away from the Blade
Maintain a safe distance between your hands and the cutting area at all times. Never reach across the blade while it is moving.
Allow Full Blade Speed
Wait until the blade reaches full operating speed before beginning the cut. This produces smoother results and reduces strain on the motor.
Cut with Steady Pressure
Guide the blade smoothly through the material without forcing it. Excessive pressure can reduce accuracy and increase wear on the blade.
Disconnect Power Before Maintenance
Always unplug the tool or remove the battery before changing the blade, making adjustments, or performing maintenance.
Keep the Workspace Clean
Remove wood scraps, dust, and unnecessary tools from the work area. A clean workspace reduces distractions and minimizes the risk of accidents.
Store the Tool Properly
After use, clean the tool thoroughly and store it in a dry location away from moisture and unauthorized users. Proper storage helps maintain performance and extends its service life.
Miter Saw Parts, Maintenance, and Care Tips
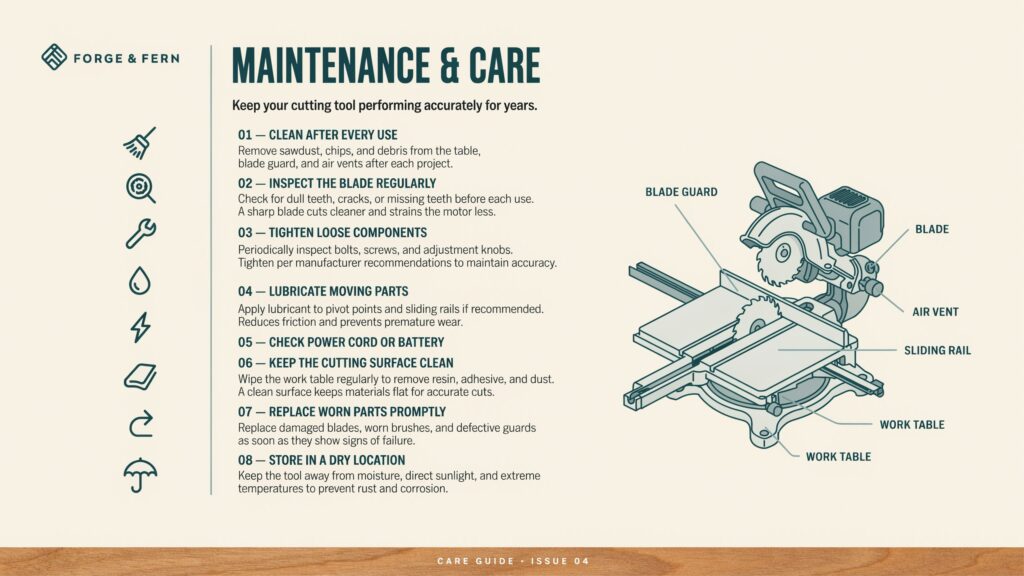
Proper maintenance keeps your cutting tool performing accurately, extends its lifespan, and reduces the risk of unexpected breakdowns. A few simple care habits can help maintain smooth operation and consistent cutting results for years.
Clean After Every Use
Remove sawdust, wood chips, and debris from the table, blade guard, air vents, and surrounding surfaces after each project. Keeping the tool clean prevents dust buildup that can affect performance and moving parts.
Inspect the Blade Regularly
Check the blade for dull teeth, cracks, missing teeth, or excessive wear before each use. A sharp, undamaged blade produces cleaner cuts, improves efficiency, and places less strain on the motor.
Tighten Loose Components
Over time, vibration can loosen bolts, screws, and adjustment knobs. Periodically inspect all fasteners and tighten them according to the manufacturer’s recommendations to maintain cutting accuracy and stability.
Lubricate Moving Parts
Apply lubricant to pivot points, sliding rails, and other moving components if recommended by the manufacturer. Proper lubrication reduces friction, improves movement, and helps prevent premature wear.
Check the Power Cord or Battery
For corded models, inspect the power cord for cuts, fraying, or other damage before each use. For cordless models, keep the battery clean, fully charged, and stored according to the manufacturer’s guidelines to maximize battery life.
Keep the Cutting Surface Clean
Wipe the work table regularly to remove resin, adhesive, and dust buildup. A clean surface allows materials to sit flat, resulting in more accurate and consistent cuts.
Replace Worn Parts Promptly
Replace damaged blades, worn brushes, defective guards, or other worn components as soon as they show signs of failure. Using damaged parts can reduce performance and create safety risks.
Store in a Dry Location
Keep the tool in a clean, dry environment away from excessive moisture, direct sunlight, and extreme temperatures. Proper storage helps prevent rust, corrosion, and damage to electrical components.
Protect the Blade During Storage
If the tool will not be used for an extended period, lower the blade into its locked position or use a protective blade cover if available. This helps protect the cutting edge from accidental damage.
Follow the Manufacturer’s Maintenance Schedule
Always refer to the user manual for recommended inspection intervals, lubrication points, replacement schedules, and maintenance procedures. Following these guidelines helps ensure reliable performance and extends the service life of the tool.
Conclusion
Choosing the right mini miter saw depends on the type of projects you plan to complete, the materials you work with, and the features that matter most to you. By understanding its applications, key features, safety practices, and maintenance requirements, you can make an informed decision and achieve cleaner, more accurate cuts. Whether you’re a hobbyist, DIY enthusiast, or experienced woodworker, selecting the right tool will improve both the quality and efficiency of your work.
Frequently Asked Question
Q1. Which miter saw is best for cutting trim?
For most trim work, a compound model is the best choice because it delivers accurate angle cuts for baseboards, crown molding, and door casings. If you mainly work on small trim pieces, a compact model is usually sufficient.
Q2. What is the smallest size miter saw?
The smallest miter saws typically have a 4-inch blade, making them ideal for crafts, trim, and small woodworking projects.
Q3. Is there a mini miter saw?
Yes. Compact models are available for hobbyists, DIY enthusiasts, and woodworkers who need precise cuts on small materials. They are lightweight, portable, and well suited for crafts, trim, and detailed woodworking projects.
Q4. What is an alternative to a miter saw?
Good alternatives include a miter box with a hand saw, a circular saw with a guide, a table saw with a miter gauge, or a track saw. The best option depends on your project, budget, and the level of cutting accuracy you need.
Q5. How to mitre without a saw?
You can create miter joints by using a miter box and hand saw, a miter cutting jig, or by carefully marking the angle with a protractor before cutting with another suitable tool. Accurate measuring and secure material support are essential for clean results.