
Introduction
A coping saw is a useful woodworking hand tool designed for cutting curves, detailed shapes, and narrow sections of wood. Its thin blade and lightweight frame allow users to work on patterns and corners that are difficult to cut with larger saws. Understanding its parts, working method, common uses, and maintenance can help beginners and experienced woodworkers achieve better results.

Table of Contents
What Is a Coping Saw?
A coping saw is a small, hand-operated woodworking tool designed for cutting curves, detailed shapes, and narrow sections of wood. It has a thin, replaceable blade held under tension by a U-shaped metal frame. Its narrow blade can turn easily, making it useful for cutting curved patterns and detailed designs that are difficult to produce with straight-cutting saws.
How Does It Work?
A coping saw works through a simple back-and-forth cutting motion. Its thin blade is stretched tightly between two ends of a metal frame, allowing it to cut along straight or curved lines. The user guides the handle while applying gentle pressure to move the blade through the material.
For accurate results, mark the desired shape on the wood before starting. Keep the blade aligned with the cutting line and use steady strokes rather than forcing it through the material.
The blade tension helps prevent unwanted bending, while the narrow cutting blade makes it easier to follow tight curves and detailed patterns. Many models also allow the blade to rotate, helping users change cutting direction without turning the entire workpiece.
Using the correct tooth direction, suitable blade, and controlled movement can improve cutting accuracy and produce smoother edges.
Main Purpose of a Coping Saw
The main purpose of a coping saw is to make accurate curved cuts, intricate shapes, and detailed adjustments in wood. Unlike ordinary hand saws with wider blades, this tool uses a narrow, flexible blade that can follow curved cutting lines and reach tight areas. It is especially useful for woodworking tasks where straight cuts are not enough to achieve the required shape or fit.

1. Cutting Curves and Rounded Shapes
One of its primary functions is cutting curved outlines in wooden materials. The narrow blade allows users to follow circular patterns, wavy lines, and irregular shapes with greater control. This is useful when making decorative wooden panels, furniture details, and craft designs.
2. Creating Accurate Coping Joints
Another important application is preparing coping joints for interior wood trim. When two pieces of decorative moulding meet at an inside corner, one piece can be shaped to match the profile of the other. Carefully removing the unwanted wood helps create a closer-fitting joint and reduces visible gaps.
3. Making Internal Openings
This tool can also cut openings inside a wooden board without starting from an outside edge. A small starter hole is drilled inside the marked area, and the blade is detached from the frame, passed through the hole, and reconnected. The user can then cut along the outline to create an opening for decorative or functional purposes.
4. Trimming Small Wooden Components
Woodworkers use it to remove excess material from small components that need careful shaping. It is suitable for wooden toys, model-making, craft projects, and decorative details where larger cutting tools may be difficult to control.
5. Improving Detailed Woodworking Work
The narrow blade makes it easier to work around tight corners and complex patterns. It can help prepare edges before sanding, fitting, or finishing. However, it is not designed for heavy timber cutting, thick construction materials, or fast removal of large amounts of wood.
When Is This Tool the Right Choice?
Choose this hand tool when a project requires:
- Curved cuts rather than long, straight cuts.
- Detailed shapes in thin wooden boards.
- Accurate trimming around decorative mouldings.
- Internal openings and small cutout designs.
- Controlled material removal from delicate workpieces.
For thicker materials or long straight cuts, a different saw may provide better cutting speed and stability. Selecting the right tool for each task helps produce cleaner results and prevents unnecessary damage to the material.
Common Uses of a Coping Saw in Woodworking
A coping saw is useful for woodworking tasks that require curved cuts, shaped edges, and detailed adjustments. Its narrow blade can move through small spaces and follow marked patterns that are difficult to cut with wider saw blades. Woodworkers commonly use this hand tool for the following jobs.
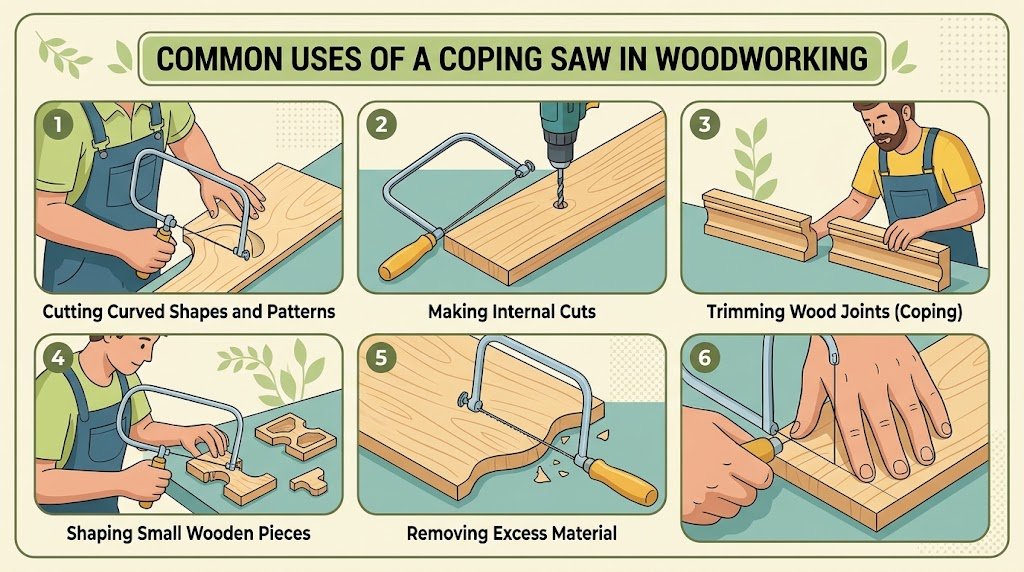
Cutting Curved Shapes and Patterns
One important use is cutting rounded shapes, circles, and decorative patterns in wood. The thin blade can follow curved outlines with controlled movements. This is helpful when making wooden ornaments, small craft projects, and decorative panels.
Trimming Wood Joints
Woodworkers use this tool to refine coping joints, especially when fitting decorative mouldings around inside corners. It helps remove excess material from the end of a moulding so its profile can fit against another piece. Accurate marking and careful cutting help create a closer joint.
Making Internal Cuts
It can also make internal cuts in wooden boards. First, drill a small starter hole inside the marked area. Remove the blade from one end of the frame, pass it through the hole, and attach it again before cutting along the outline. This technique is useful for creating openings and decorative shapes.
Shaping Small Wooden Pieces
The narrow blade provides better control when working on small components. It is commonly used for wooden crafts, model-making, toys, and delicate woodworking projects where large saws may remove too much material.
Removing Excess Material
A woodworker can use this tool to remove unwanted sections around a marked shape before sanding. This reduces the amount of material that needs further finishing and helps prepare edges for accurate fitting.
Common Coping Saw Mistakes and Safety Tips
Using a hand saw for detailed woodworking requires patience, proper blade selection, and controlled movement. Small mistakes can cause rough edges, broken blades, inaccurate cuts, or hand injuries. Understanding common problems before starting a project helps improve cutting results and makes the work safer.
Common Mistakes to Avoid
Choosing an unsuitable blade can make cutting difficult. Coarse teeth may produce rough edges in thin wood, while a blade that is too fine may cut slowly through thicker material. Select the correct blade teeth per inch (TPI) according to the material’s thickness and hardness.
Applying Too Much Pressure
Pushing the saw aggressively can bend or break its thin blade. It may also cause the blade to move away from the marked line. Use light, steady strokes and allow the teeth to remove material gradually.
Incorrect Blade Tension
A loose blade can twist during cutting and produce inaccurate results. Excessive tension can also damage the blade or frame. Check the manufacturer’s instructions and maintain suitable blade tension before starting.
Ignoring the Cutting Direction
Turning the blade sharply without allowing enough space can cause it to bind in the wood. For tight curves, make small directional adjustments and avoid forcing the blade around corners.
Important Safety Tips
- Secure the Workpiece: Use a suitable workbench or clamp to prevent the wood from moving during cutting.
- Keep Hands Away: Hold the material safely and keep fingers outside the blade’s cutting path.
- Inspect the Blade: Check for bent, cracked, loose, or damaged teeth before use. Replace worn blades when necessary.
- Wear Eye Protection: Safety glasses help protect your eyes from small wood particles and broken blade fragments.
- Maintain a Comfortable Position: Keep your body balanced and position the workpiece at a convenient height to maintain control.
- Keep the Work Area Clear: Remove loose materials, tools, and debris that could interfere with cutting.
- Handle Broken Blades Carefully: Stop working immediately if a blade breaks. Remove the damaged piece carefully and replace it before continuing.
What to Do If the Blade Gets Stuck
If the blade becomes trapped in the wood, stop moving the handle and release cutting pressure. Check whether the cut is closing around the blade or whether the blade has twisted. Carefully remove the saw without pulling forcefully. If necessary, adjust the workpiece or make a small relief cut to provide more clearance.
Regular inspection, suitable blade selection, and controlled cutting movements help prevent common woodworking problems and improve the quality of finished projects.
Benefits of a Coping Saw
Choosing the right cutting tool can make woodworking easier, especially when a project involves curved lines, narrow openings, or decorative shapes. A coping saw offers several practical advantages because of its lightweight frame, narrow blade, and manual operation. It gives woodworkers greater control over detailed cutting tasks without requiring a large electric machine.
1. Accurate Cutting of Curved Shapes
One major advantage is its ability to follow curved outlines. The narrow blade can move around rounded edges, circles, and irregular patterns more easily than wider saw blades. This makes it useful for decorative woodworking, wooden crafts, and projects that require detailed shapes.
2. Better Control Over Small Projects
Its lightweight design and comfortable handle make it easier to guide during delicate work. Woodworkers can adjust their hand movements gradually to follow marked lines. This level of control is helpful when working with small wooden components, thin boards, and model-making materials.
3. Useful for Detailed Joint Work
It is particularly helpful when preparing coping joints in decorative moulding. The blade can remove small sections of material so one moulding profile fits against another at an inside corner. A carefully prepared joint can reduce visible gaps and improve the appearance of finished trim.
4. Allows Internal Cutting
Another practical benefit is the ability to create openings inside a wooden piece. By drilling a starter hole and passing the detached blade through it, users can cut shapes without beginning at the outside edge. This is useful for internal cutouts, decorative openings, and craft designs.
5. No Electricity Required
Because it operates manually, this tool does not need electricity, batteries, or a power connection. It can be used in a home workshop, classroom, or outdoor work area. Its simple operation also makes it convenient for small projects where setting up an electric saw would take unnecessary time.
6. Replaceable Blades for Different Tasks
Many models use replaceable blades with different tooth sizes. A suitable fine-toothed blade can provide smoother results in thin materials, while a more appropriate coarser blade may work better for faster cutting in thicker wood. Always check blade compatibility before replacement.
7. Easy to Store and Maintain
Its compact frame takes up relatively little storage space compared with larger woodworking machines. Cleaning sawdust, checking blade tension, and keeping metal parts dry are simple maintenance tasks that help maintain reliable performance.
8. Suitable for Beginners and Experienced Woodworkers
Beginners can use it to learn controlled cutting movements, while experienced woodworkers can use it for detailed adjustments and decorative work. However, good results still depend on correct blade selection, proper tension, secure workpiece positioning, and steady hand movement.
Effective Techniques for Using a Coping Saw
Getting clean and accurate cuts requires more than simply moving a saw back and forth. Proper hand positioning, blade direction, cutting speed, and workpiece preparation all affect the final result. Learning a few practical woodworking techniques can help beginners and experienced users handle curved shapes, narrow openings, and detailed patterns with better control.
1. Mark the Cutting Line Clearly
Before cutting, draw the required shape on the wood using a pencil or marking tool. Make sure the outline is easy to see, especially around tight curves and corners. Accurate marking helps prevent unnecessary material removal and reduces cutting mistakes.
2. Maintain the Correct Blade Position
Keep the blade properly aligned with the marked outline. For most cutting tasks, position the teeth to cut on the pull stroke, following the blade manufacturer’s directional markings. Maintain a comfortable grip and avoid twisting the frame unnecessarily.
3. Use Short Strokes for Tight Curves
When working around small curves, use shorter and slower movements. This gives you more control over the cutting direction and helps prevent the blade from bending or moving outside the marked line. Avoid forcing the blade around sharp turns.
4. Start Cutting From the Edge
Place the blade against the starting point of the marked line and begin with gentle strokes. Once a small groove develops, continue with steady movements. This initial groove helps guide the blade and reduces the chance of slipping.
5. Make Internal Cuts With a Starter Hole
For openings inside a wooden board, first drill a hole large enough to pass the detached blade through. Remove one end of the blade from the frame, insert it through the opening, and reconnect it securely. Then follow the marked outline using controlled strokes.
6. Use the Blade Rotation Technique
Some models allow the blade to rotate within their holders. This feature helps change the cutting direction without constantly repositioning the workpiece. It is particularly useful for intricate patterns, narrow spaces, and awkward cutting angles. Check your model’s instructions before adjusting the blade.
7. Leave Extra Material for Final Shaping
When cutting decorative shapes or fitting wooden joints, avoid removing too much material at once. Leave a small amount outside the final line and remove it gradually through careful cutting or sanding. This technique helps achieve more accurate dimensions.
8. Support the Material Properly
Use a stable workbench and suitable clamps to prevent movement. For thin or delicate boards, provide support close to the cutting area without blocking the blade. Proper support reduces vibration and helps produce cleaner edges.
9. Choose the Correct Blade for the Job
The number of teeth per inch (TPI) affects how a blade cuts. Fine-toothed blades generally provide smoother results in thinner materials, while coarser teeth can remove material faster. Always consider wood thickness, hardness, and the required finish when selecting a blade.
10. Finish the Cut Carefully
After completing the outline, inspect the edges for rough spots or unwanted material. Use suitable fine-grit sandpaper to smooth minor imperfections. Avoid excessive sanding because it can change the shape and dimensions of your finished piece.
How to Clean, Maintain, and Store a Coping Saw
Regular cleaning and maintenance help keep woodworking tools reliable and safe to use. Dust, wood particles, and moisture can collect around the blade, frame, and handle during cutting. If these materials are not removed, they may contribute to rust, loose fittings, or reduced cutting performance. A simple care routine can extend the tool’s working life and help maintain accurate cuts.
Remove Dust and Wood Particles
After each project, remove sawdust and small wood pieces from the blade, frame, and blade holders. Use a soft brush or dry cloth to clean difficult areas. Avoid using your fingers along the sharp teeth because they can cause cuts.
Clean and Protect the Metal Blade
Wipe the saw blade with a clean, dry cloth to remove dirt and moisture. If sticky residue remains, use a suitable tool cleaner according to its instructions. For carbon-steel blades, a light protective oil can help reduce rust. Avoid applying excessive oil because it may collect dust during storage.
Inspect Blade Tension and Frame
Check the blade tension mechanism, frame, and adjustment points regularly. Make sure the blade is properly fitted and does not move loosely in its holders. Examine the frame for cracks, bending, or damaged connections. Replace worn or broken blades instead of continuing to use them.
Check the Handle and Fittings
A loose or damaged handle can make cutting uncomfortable and reduce control. Inspect the handle, screws, and connecting parts. Tighten loose fittings according to the manufacturer’s instructions. If the handle is cracked or unstable, repair or replace it before using the tool again.
Store It in a Dry and Safe Place
Proper tool storage protects the blade from moisture and accidental damage. Follow these practices:
- Keep the saw in a dry toolbox or cabinet.
- Store spare blades in a protective container.
- Avoid placing heavy tools on top of its frame.
- Keep sharp blades away from children.
- Do not leave the tool on damp floors or near water.
When Should You Replace the Blade?
Replace the blade when its teeth become dull, bent, broken, or heavily rusted. A damaged blade may require extra pressure and produce rough cuts. Always choose a replacement with compatible length, fitting, and tooth spacing. Check the manufacturer’s guidance before installation.
Regular inspection, careful cleaning, and proper storage help maintain the cutting performance of woodworking equipment and reduce the risk of unexpected damage.
Safety Tips for Using a Coping Saw
Safe woodworking begins with proper tool handling and a well-prepared workspace. Although this hand-operated cutting tool is relatively small, its sharp blade can cause injuries if handled carelessly. Following basic precautions helps prevent accidents, protects the material, and improves cutting accuracy.
1. Wear Appropriate Eye Protection
Always wear safety glasses when cutting wood. Small wood particles and broken blade fragments can become airborne during use. Eye protection reduces the risk of these particles entering your eyes.
2. Check the Blade Before Starting
Inspect the saw blade for bent teeth, cracks, rust, or other damage. A worn or damaged blade may break during cutting or produce uneven results. Replace it before starting your project.
3. Secure the Wooden Workpiece
Use a suitable workbench clamp or woodworking vice to hold the material firmly. A moving workpiece can cause the blade to slip away from the marked cutting line. Never hold a small piece too close to the cutting area with your fingers.
4. Maintain Proper Blade Tension
Make sure the blade is correctly fitted and sufficiently tensioned according to the manufacturer’s instructions. A loose blade can twist during cutting, while excessive tension may damage the blade or frame.
5. Avoid Applying Excessive Pressure
Use slow, controlled strokes instead of forcing the blade through the wood. Too much pressure can bend or break the blade and make accurate cutting difficult. Allow the teeth to remove material gradually.
6. Keep Your Hands Away from the Cutting Path
Position your hands so they remain clear of the blade and its movement. Maintain a comfortable grip on the handle and avoid placing fingers underneath the workpiece near the cutting line.
7. Keep Your Workspace Clean
Remove loose wood pieces, sawdust, and unnecessary tools from the work area. Good lighting is also important because it helps you see the marked cutting line and identify possible hazards.
8. Handle Blade Replacement Carefully
When installing or replacing a replacement saw blade, follow the manufacturer’s instructions. Keep your fingers away from the sharp teeth and make sure both ends are properly secured before use.
9. Store the Tool Safely After Use
After finishing your work, clean the blade and store the tool in a dry toolbox or suitable storage area. Keep spare blades covered and out of children’s reach.
Important: If the blade becomes stuck, bent, or broken during cutting, stop immediately. Do not pull or twist the tool forcefully. Release the pressure and inspect the problem before continuing.
Conclusion
A coping saw is a practical tool for woodworking projects that require curved cuts, detailed patterns, and accurate adjustments. Choosing the correct blade, maintaining proper tension, and using controlled cutting movements can improve the quality of your work. Regular cleaning, blade inspection, and safe storage also help keep the tool in good working condition. By understanding its uses and limitations, woodworkers can handle different cutting tasks more confidently and safely
Top 5 FAQs About Coping Saws
Q1. What is a coping saw used for?
A coping saw is used for cutting curves, detailed patterns, decorative shapes, and narrow sections of wood.
Q2. How does a coping saw cut wood?
It uses a thin, tensioned blade that moves back and forth to remove material along a marked cutting line.
Q3. What type of blade does a coping saw use?
It uses a narrow, replaceable blade with fine teeth. Blade selection depends on the material and the required cutting detail.
Q4. Can a coping saw cut inside shapes in wood?
Yes. You can drill a starter hole, pass the detached blade through it, reconnect the blade, and cut along the marked outline.
Q5. How do you maintain a coping saw?
Clean away sawdust after use, keep the metal parts dry, inspect the blade regularly, and store the tool in a dry place.